
Trading Bots & Strategies · Help Center
How to Create a Crypto Trading Bot on AstraBit
A crypto trading bot is automated software that connects to your exchange and places trades for you based on predefined rules, indicators, or signals — executing your strategy around the clock. This guide walks through creating and launching a bot on AstraBit: connecting your exchange, configuring strategy settings, and activating automated trading — plus how Hedge and DCA bots differ.
This content is provided for informational purposes only; not trading advice.
Before You Launch
What to Know First
A bot follows rules; it does not guarantee outcomes. Here’s what to have in place before you build.
What You Need
An AstraBit account, a supported exchange account, and API keys from that exchange with trading permissions enabled and withdrawals disabled for security.
Credits & Billing
Make sure you have enough AstraBit Credits to launch. Charges begin only after the bot executes its first trade, then apply daily until the bot is stopped or deleted.
Your Funds Stay Put
AstraBit does not take custody of your funds. Your assets remain on your connected exchange, and bots operate through API access with permissions you control.
Start Small, Test First
Begin with a small equity allocation, confirm the test transaction during setup, and monitor performance before increasing allocation. Trading digital assets involves significant risk.
Step-by-Step Setup
Create a
Standard Bot
The Create Bot wizard walks you through trading type, exchange, strategy, bot tier, and configuration.
Prerequisites Checklist
- AstraBit account with Credits available
- Exchange connected via API (trading on, withdrawals off)
- Funds in the right wallet on your exchange
Exchange-specific API instructions are linked further down this guide.
Start the Bot Creation Wizard
- Log in to your AstraBit account.
- Navigate to the Nexus dashboard.
- Open the Menu and select Create Bot — or use the Create Bot button on the left-hand side.
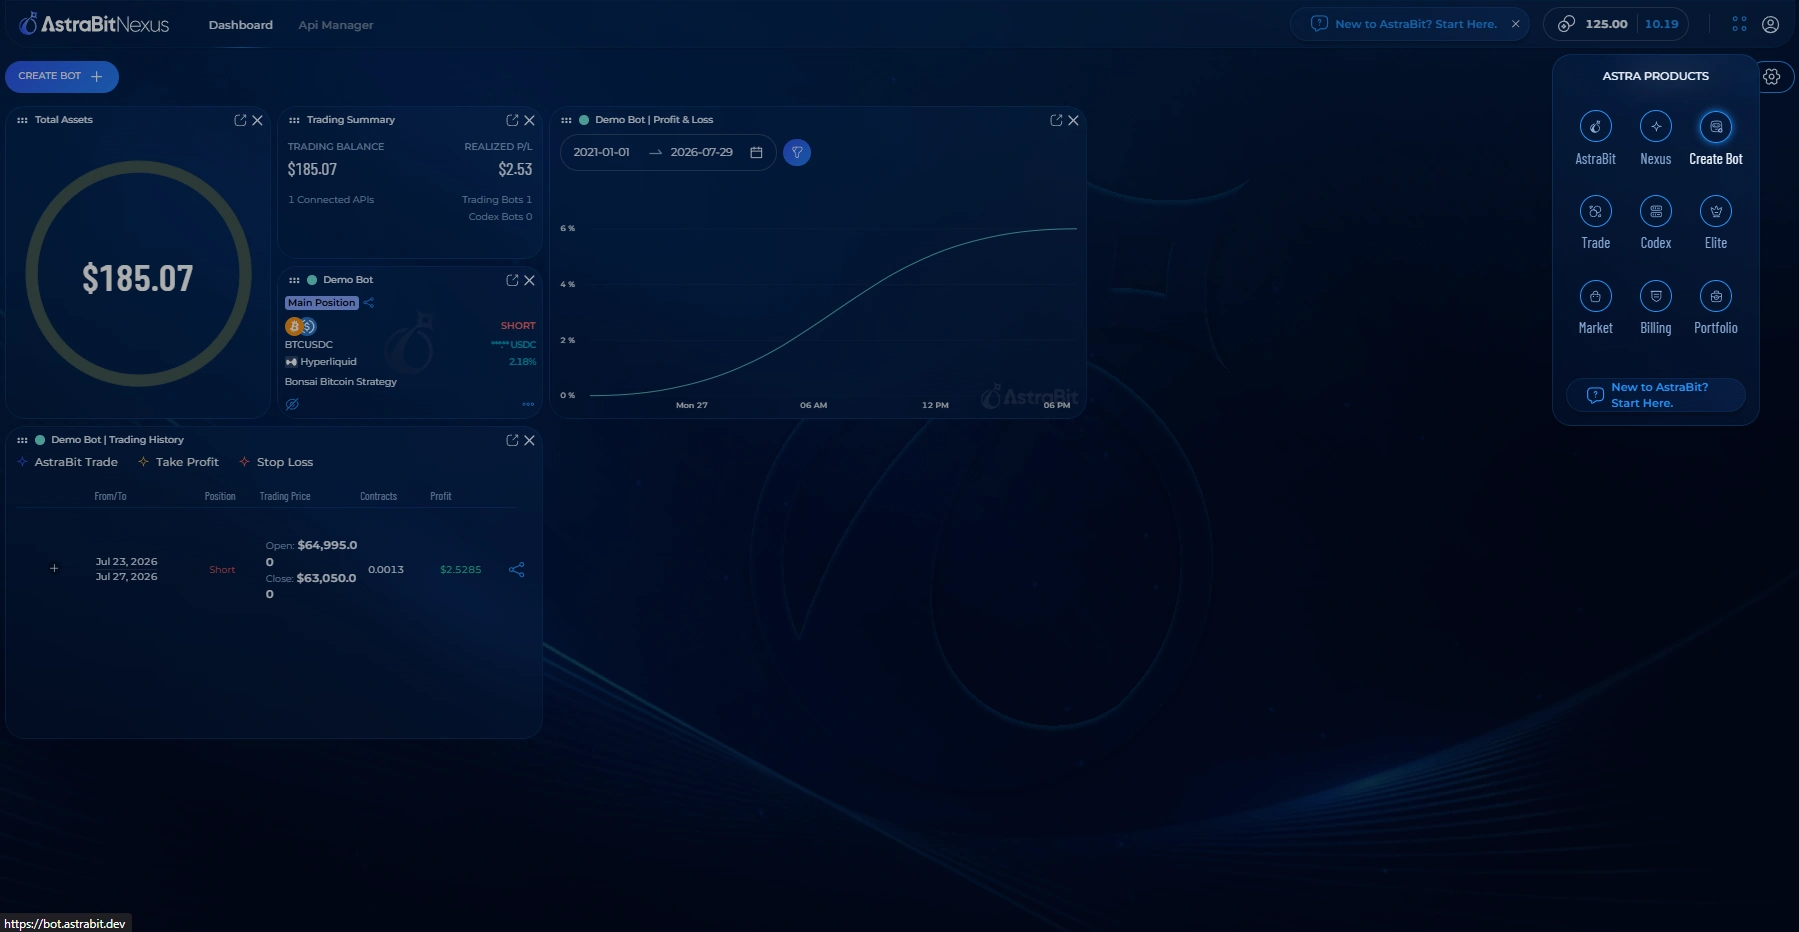
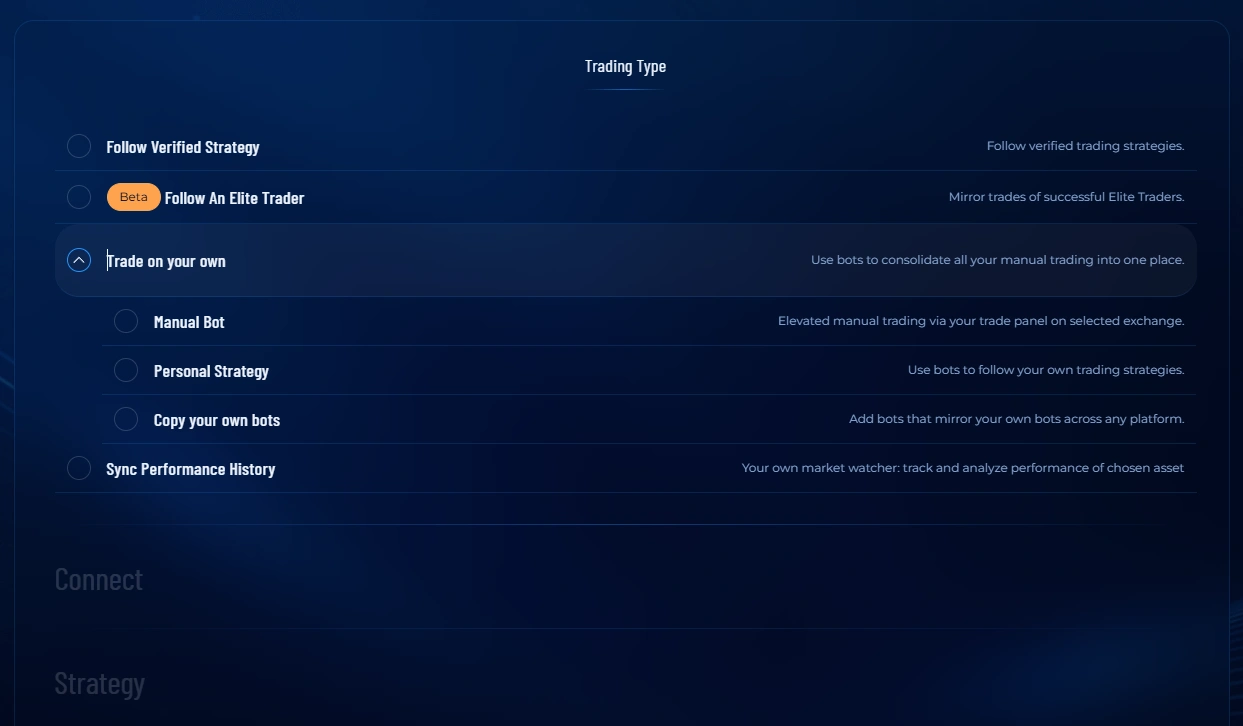
Choose Your Trading Type
- Follow a Verified Strategy — plug-and-play strategies from vetted third-party strategists, ranging from DCA to Swing to Scalping. You’ll review strategies in full in later steps.
- Follow an Elite Trader (BETA) — AstraBit’s version of copy-trading. Applications are open for Elite Traders.
- Trade Your Own Strategy — bring your own strategy, coded in any language, web-hooked from TradingView, or traded manually via AstraBit’s dashboard.
- Sync Performance History via Codex Bot — connect APIs to Codex bots to sync trade history and use it in AstraBit Portfolio analytics.
Browse the Strategy Marketplace
- Browse the available verified strategies in the marketplace.
- Filter by Strategist, Asset, Type, and Cost to narrow things down.
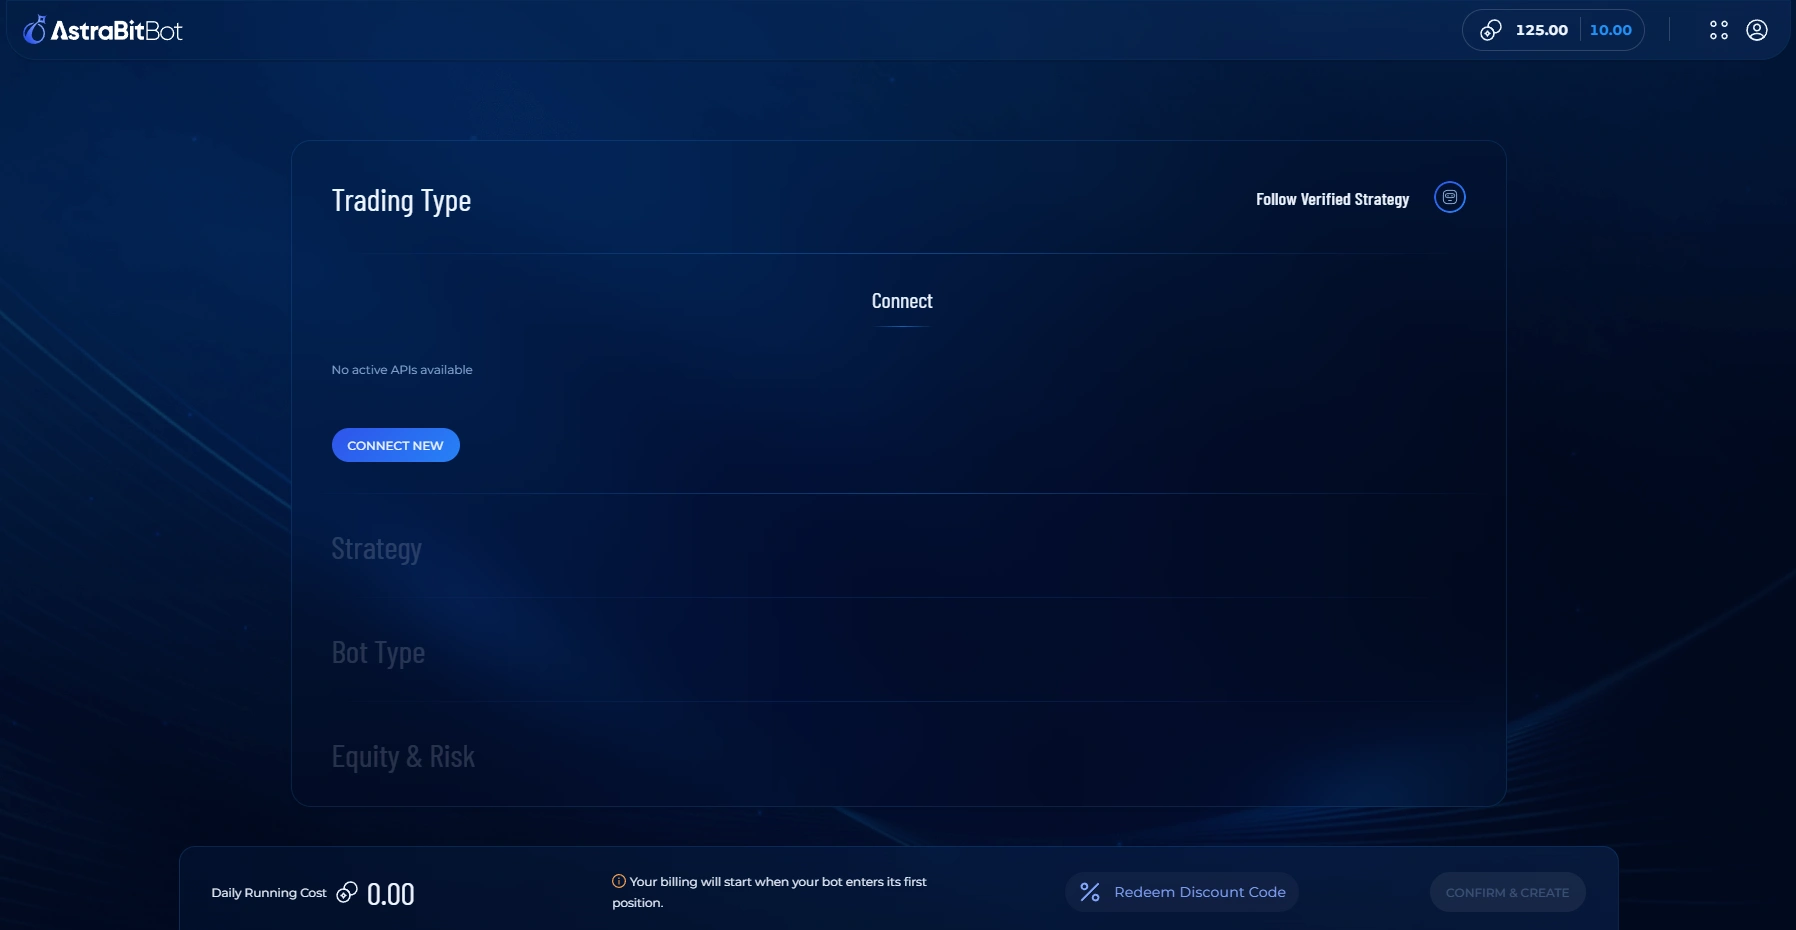
Connect an Exchange (Add Your API)
- If you haven’t connected an exchange yet, add your API here.
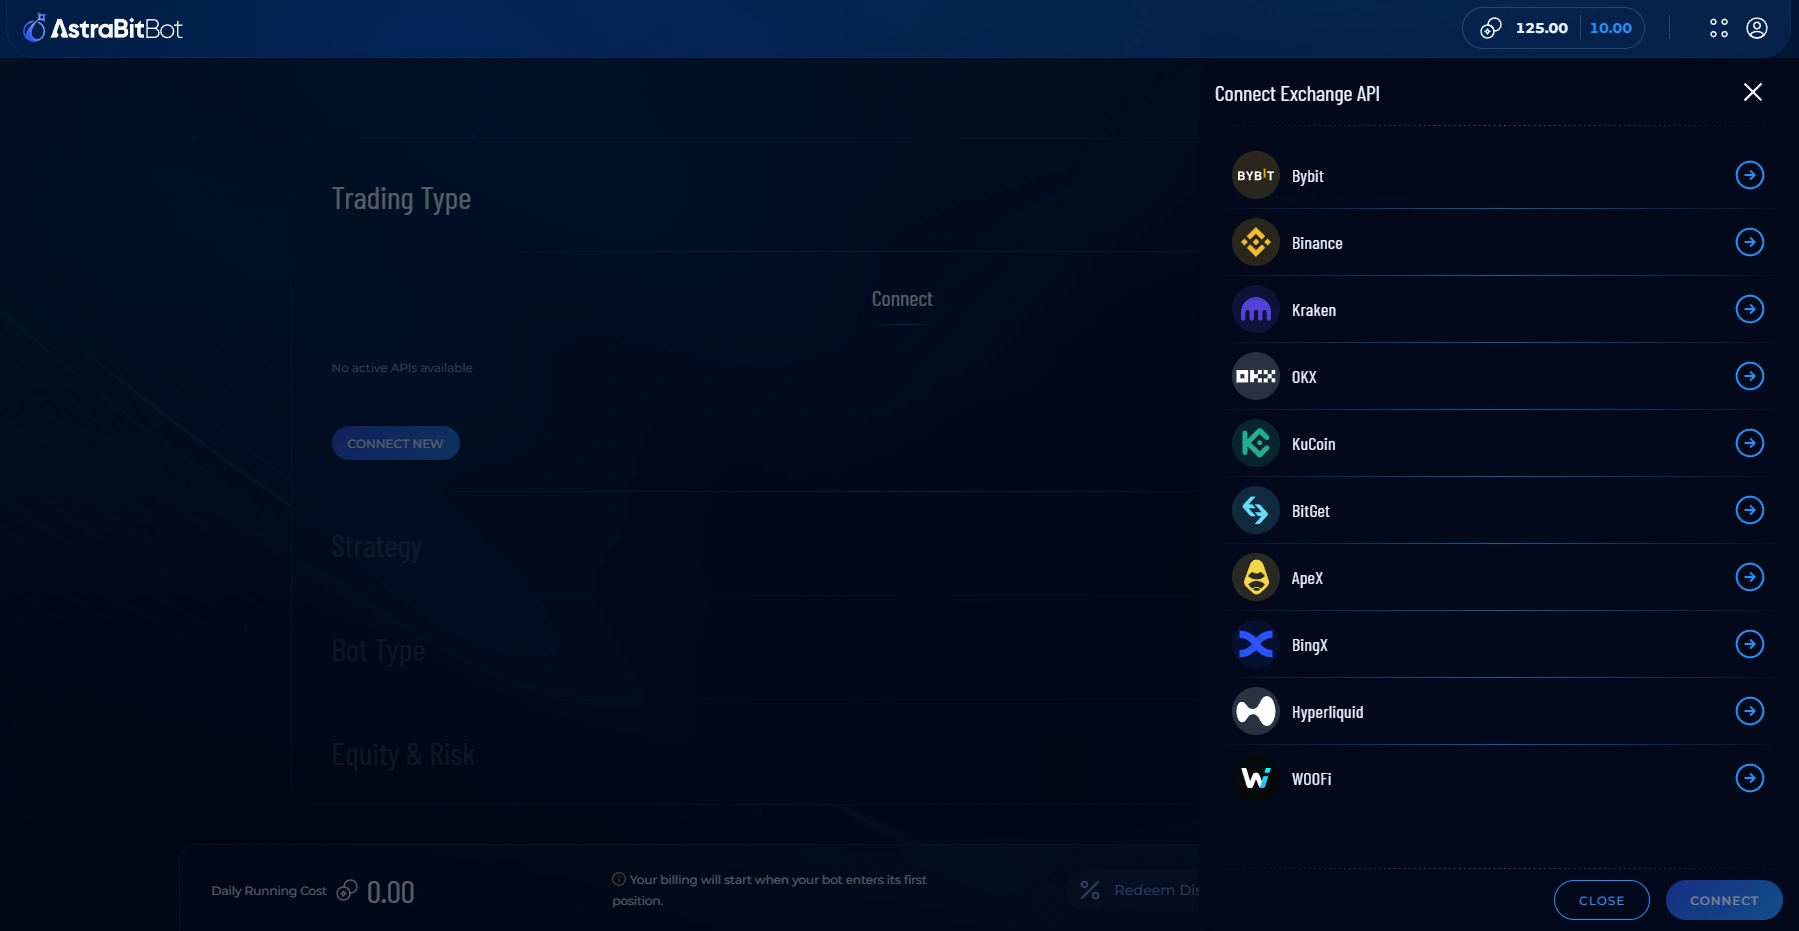
- Select Connect New, choose your exchange, and enter the API information in the fields provided.
- Select Connect — you’ll see the new API added.
For exchange-specific instructions, see the API creation guides further down this page.
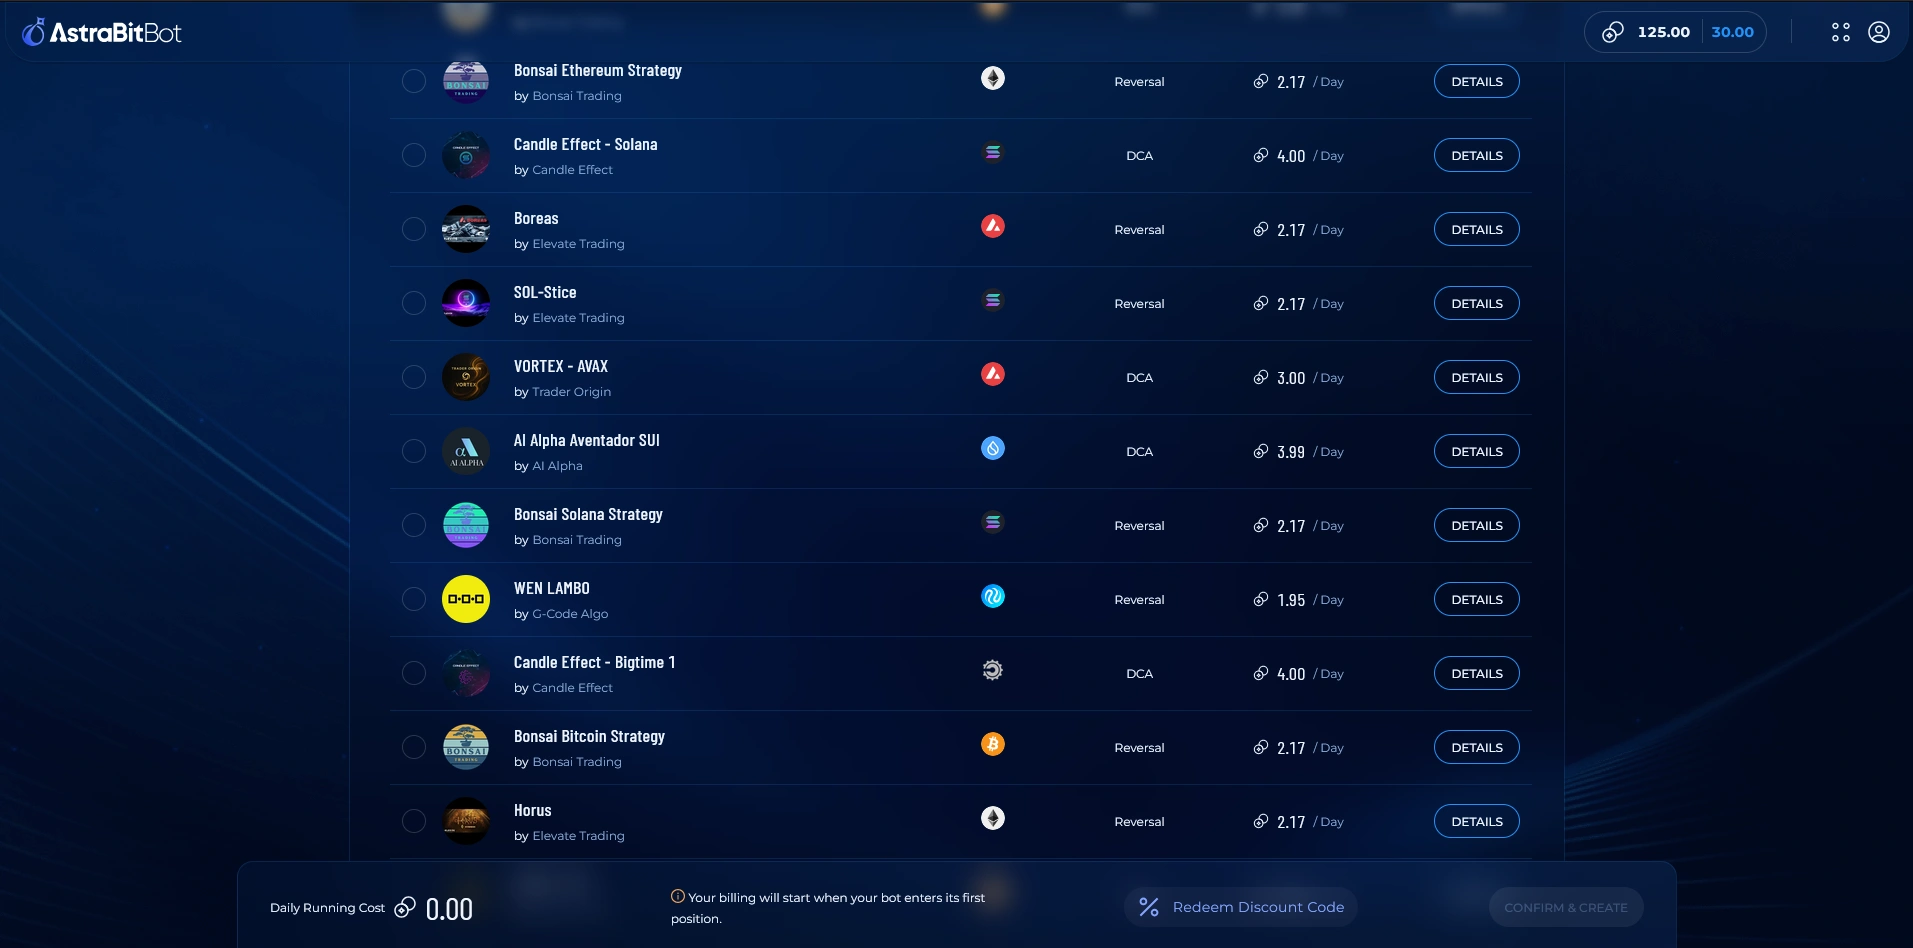
Select Your Strategy
- Select the strategy of your choice.
- Click Details for additional information.
- The PnL Calculator for each strategy is also under Details.
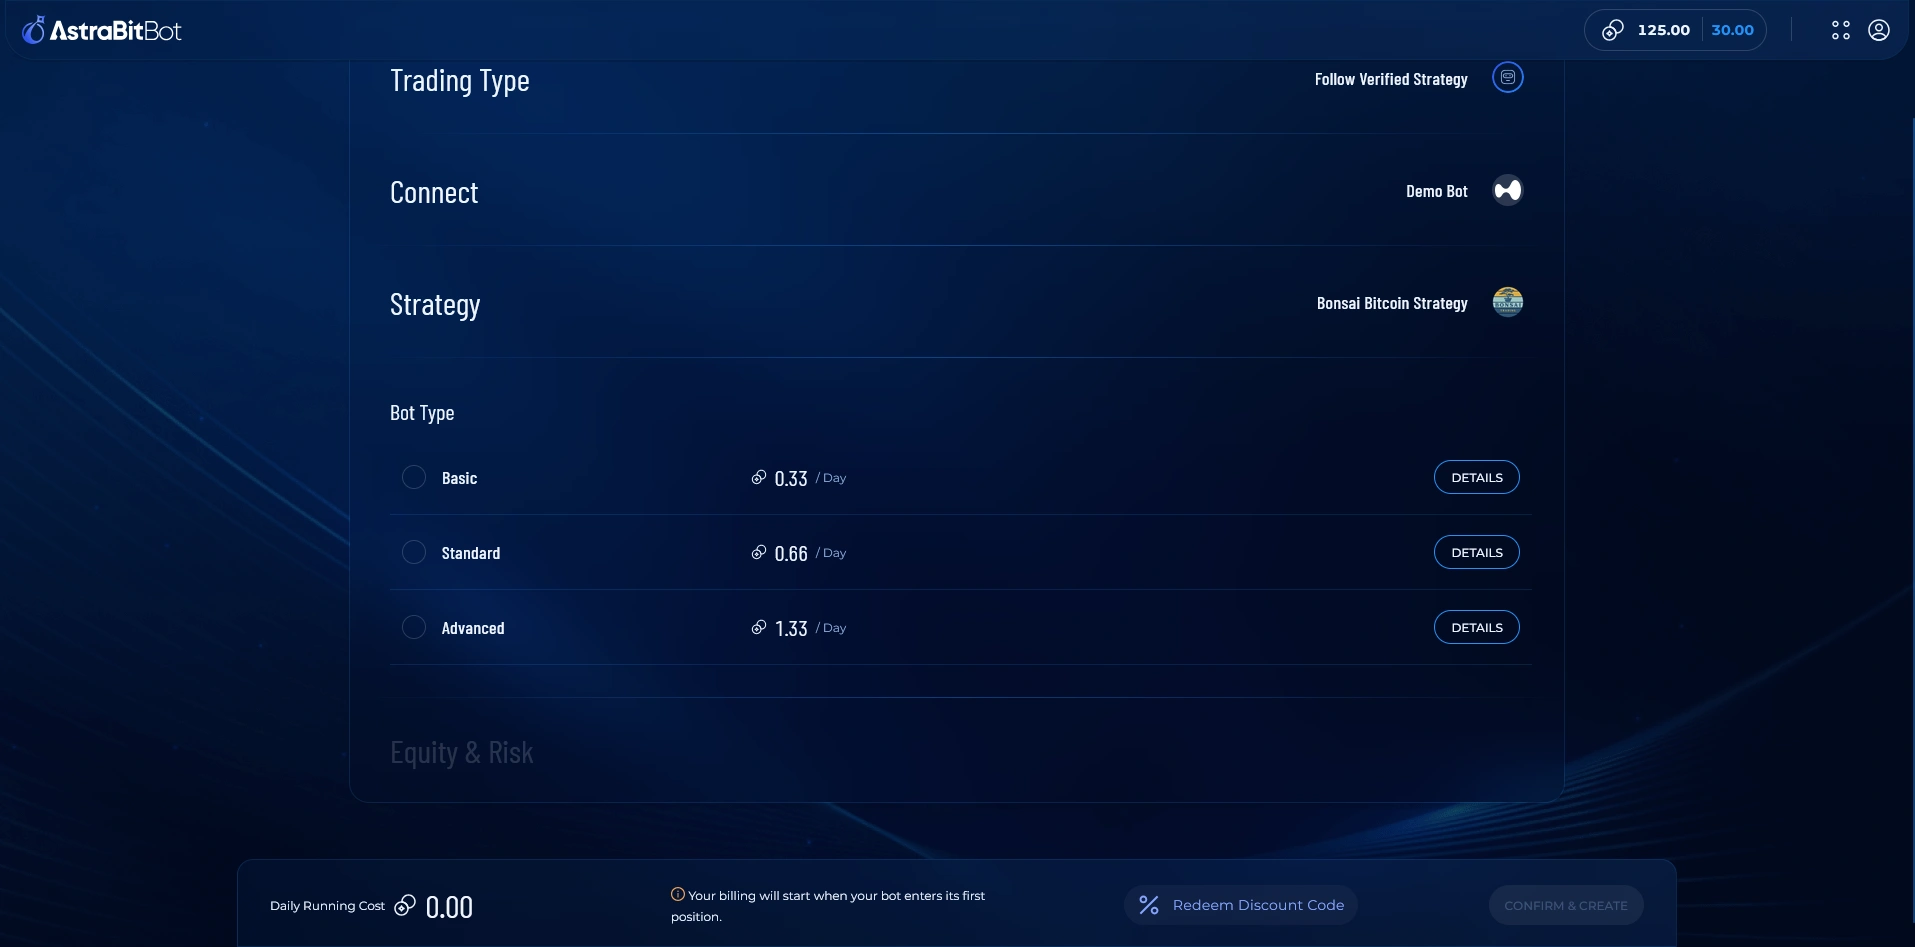
Select Your Bot Type
- Choose Basic, Standard, or Advanced.
- Click Details for a list of capabilities for each tier.
Hedge mode requires an Advanced bot — see the Hedge Bot section below.
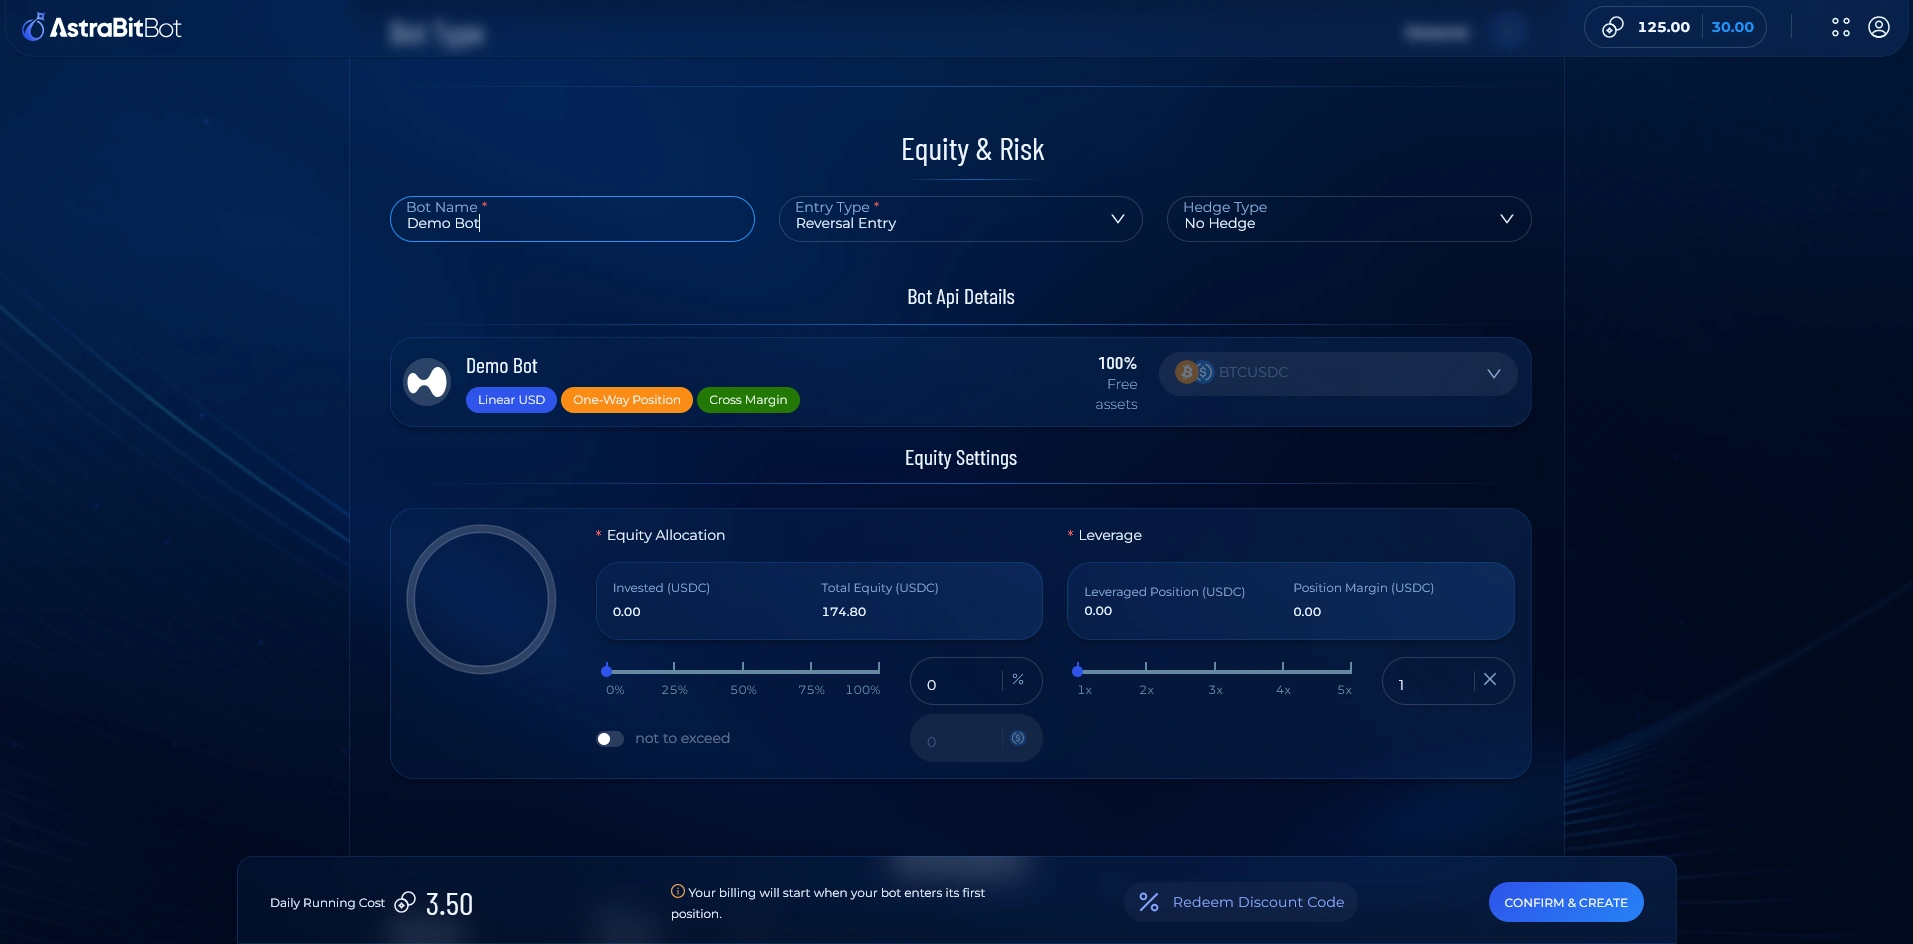
Set Up Bot Configurations
- Name your bot anything you like.
- Entry Type — based on strategy type.
- Adjust Equity Allocation — the % of funds in your account to use for each entry.
- Set a Leverage amount (optional).
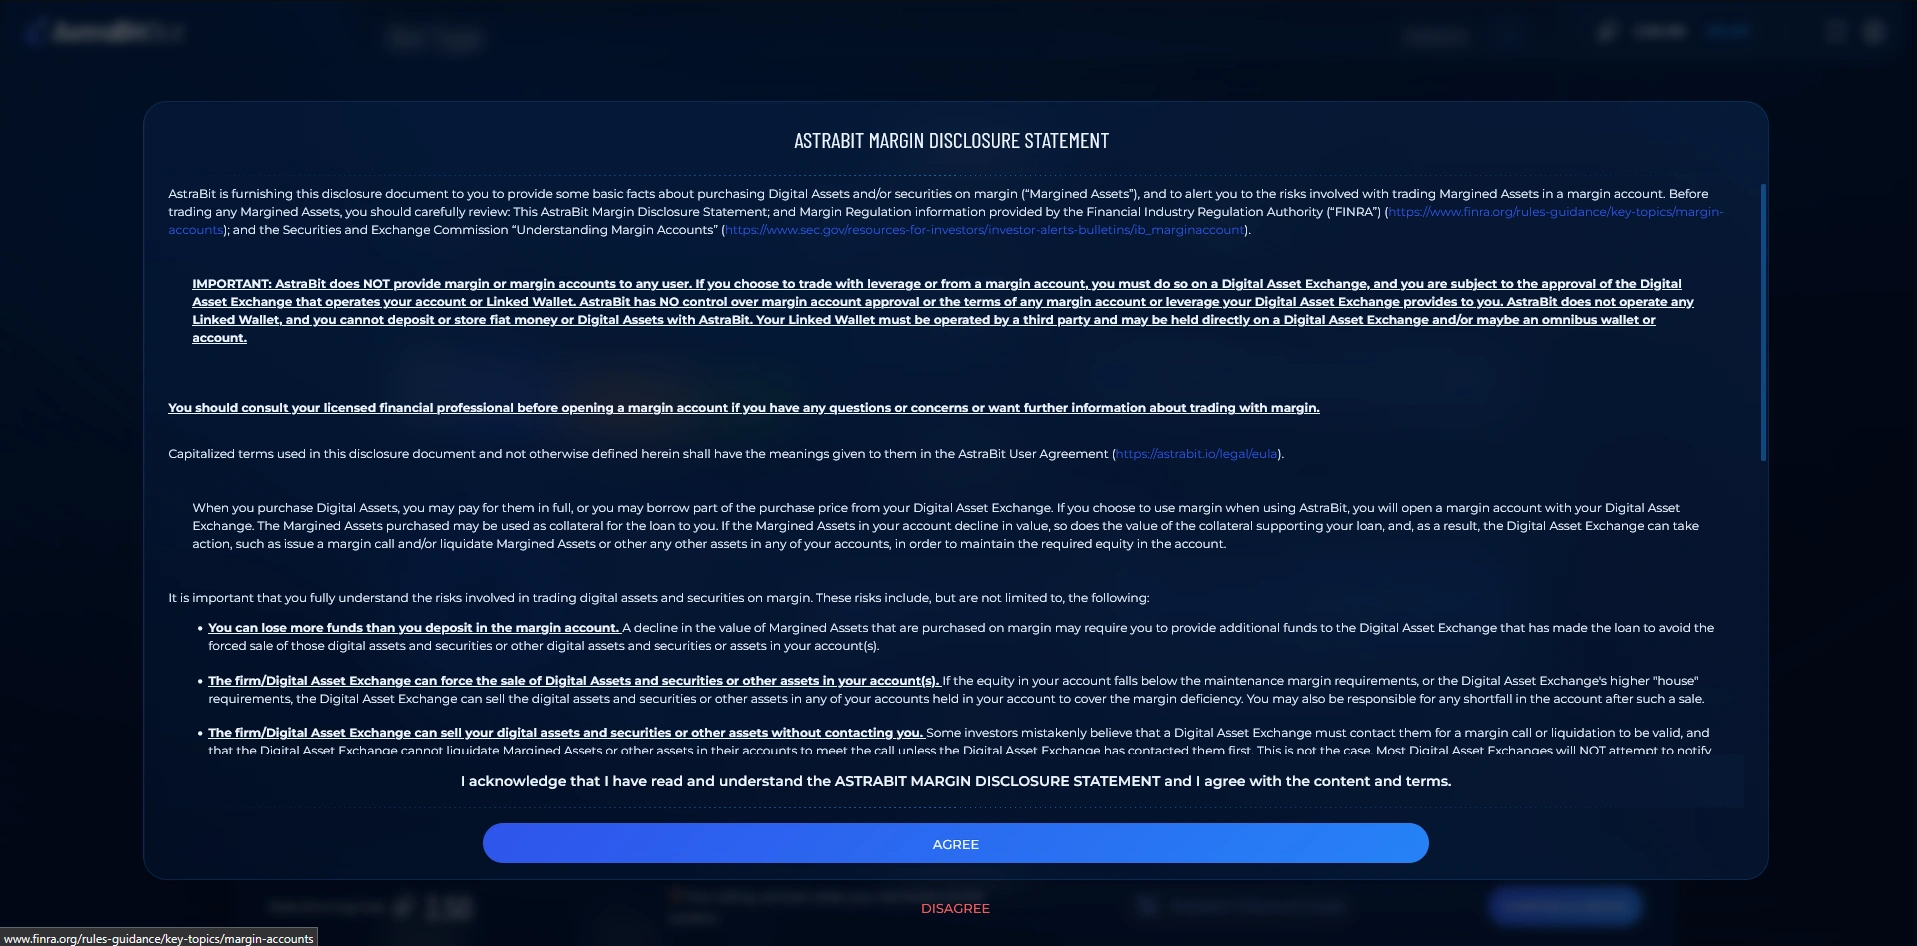
Accept the Margin Agreement
- If you set leverage, you’ll be asked to accept the Margin Agreement.
- Review and agree to continue.
This is a one-time agreement. It only appears the first time you enable leverage — once accepted, you won’t be prompted again.
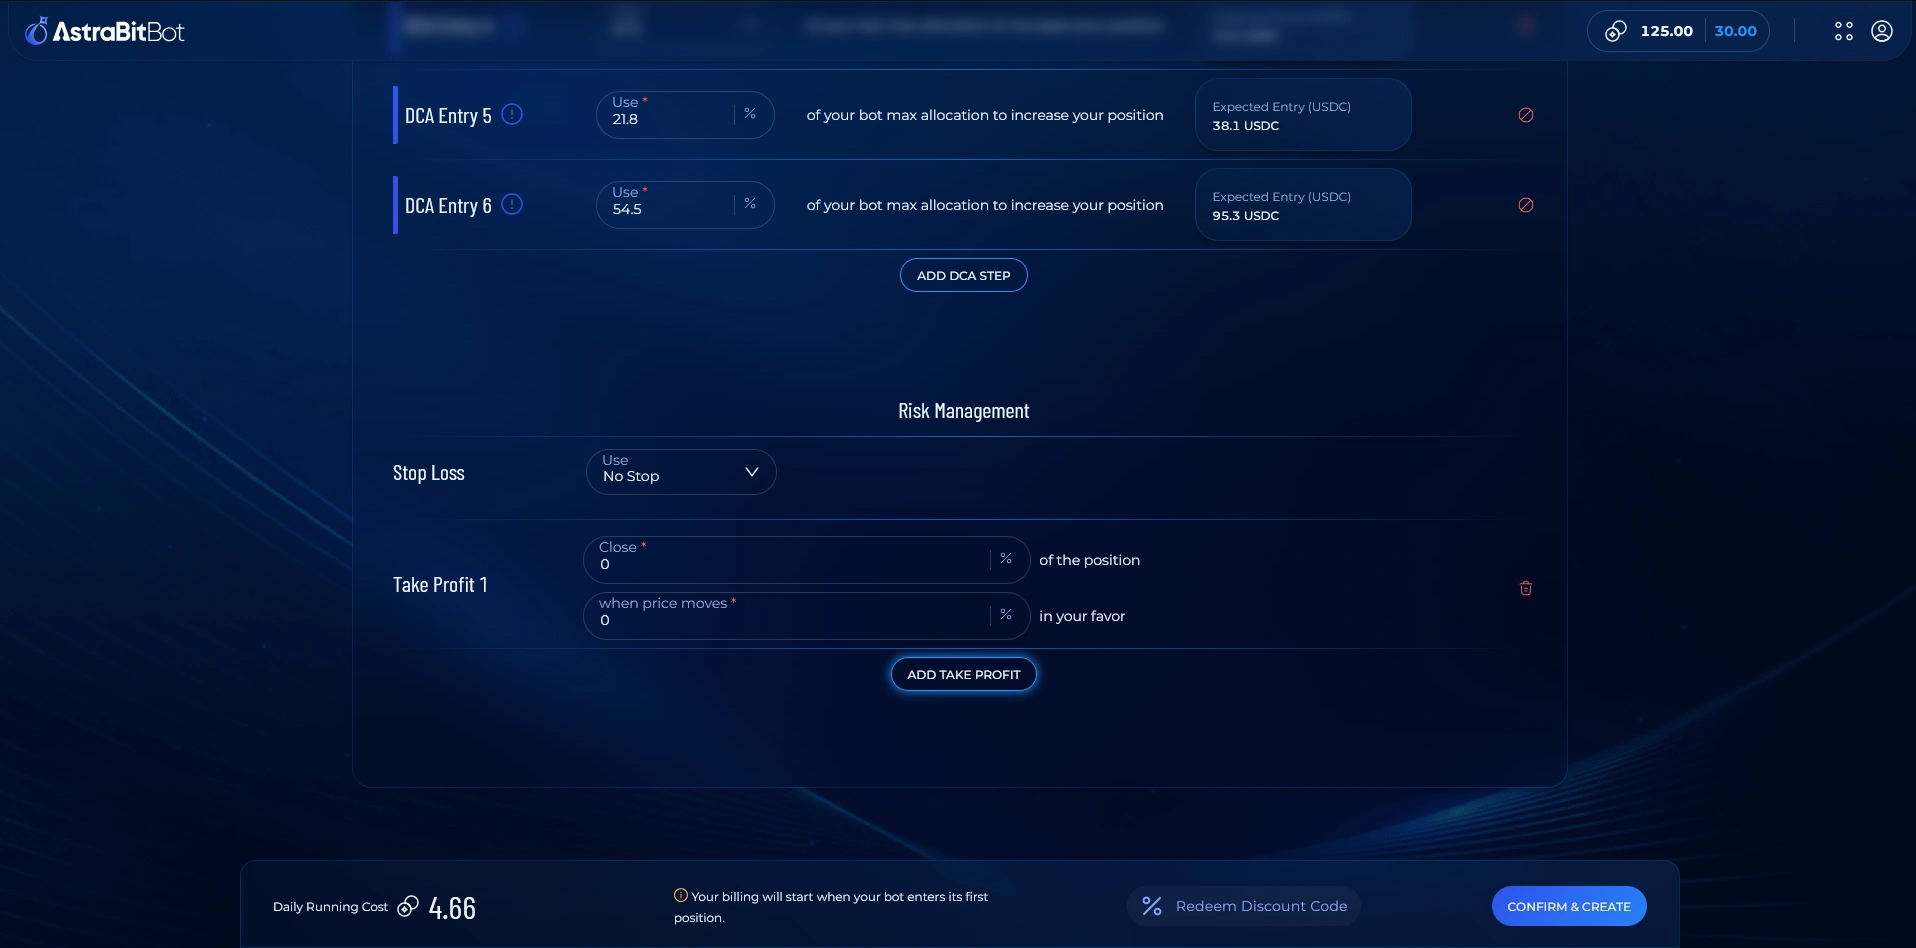
Add Risk Management (Optional)
- Set a Stop Loss (optional).
- Add a Take Profit level (optional).
- The number of Take Profit levels you can set is based on your trading bot tier.
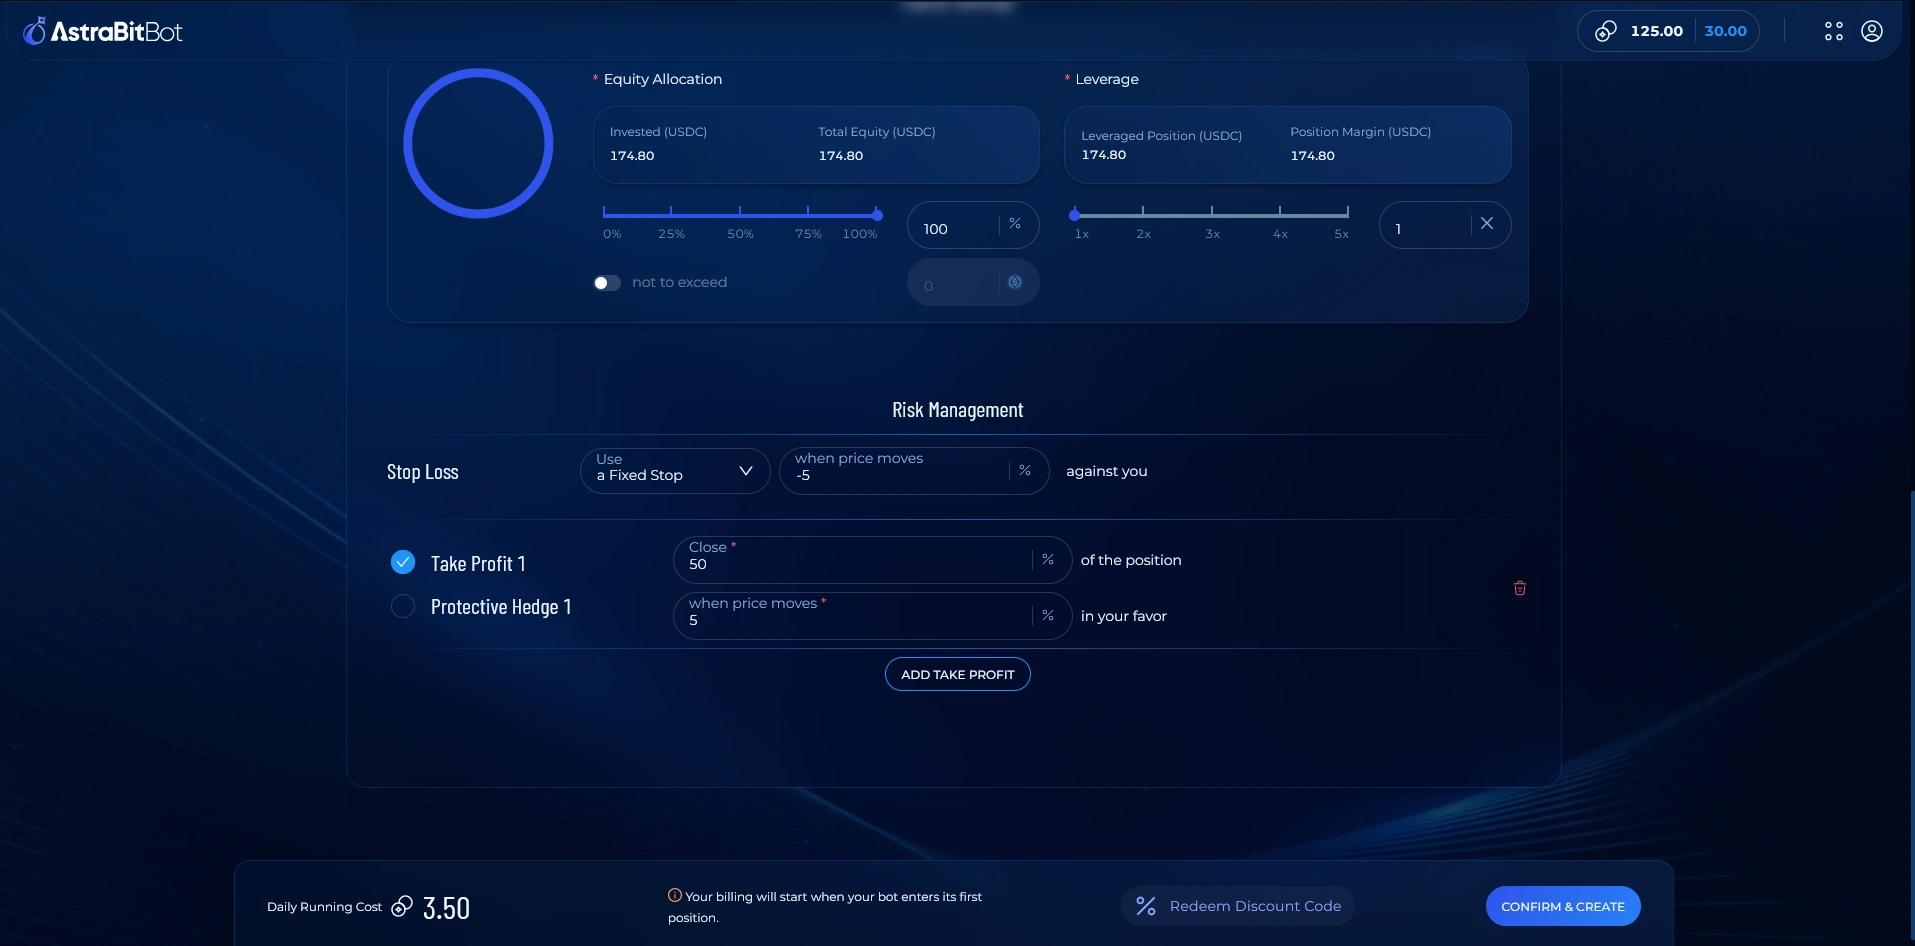
Finalize & Launch
- Review your bot configuration settings.
- Click Confirm & Create.
- Your bot sends a test transaction.
- Once complete, you’re taken to the AstraBit Trade screen, where you’ll view your trading bot activity.
Advanced Bots Only
Create a Hedge Bot
Creating a hedge bot follows the same flow as a standard bot — with one key difference: instead of a single position, you configure two sides (long and short), each with its own API, trading pair, and equity & risk settings.
Requires an Advanced Bot
Hedge mode is available on Advanced bots only. Basic and Standard bots cannot use hedge mode — select Advanced in Step 6 to unlock it.
Enable Hedge Mode
- Follow the standard steps through bot type — choosing Advanced — then enable hedge mode.
- You’ll configure two sets of APIs and pairs: one for the long side and one for the short side.
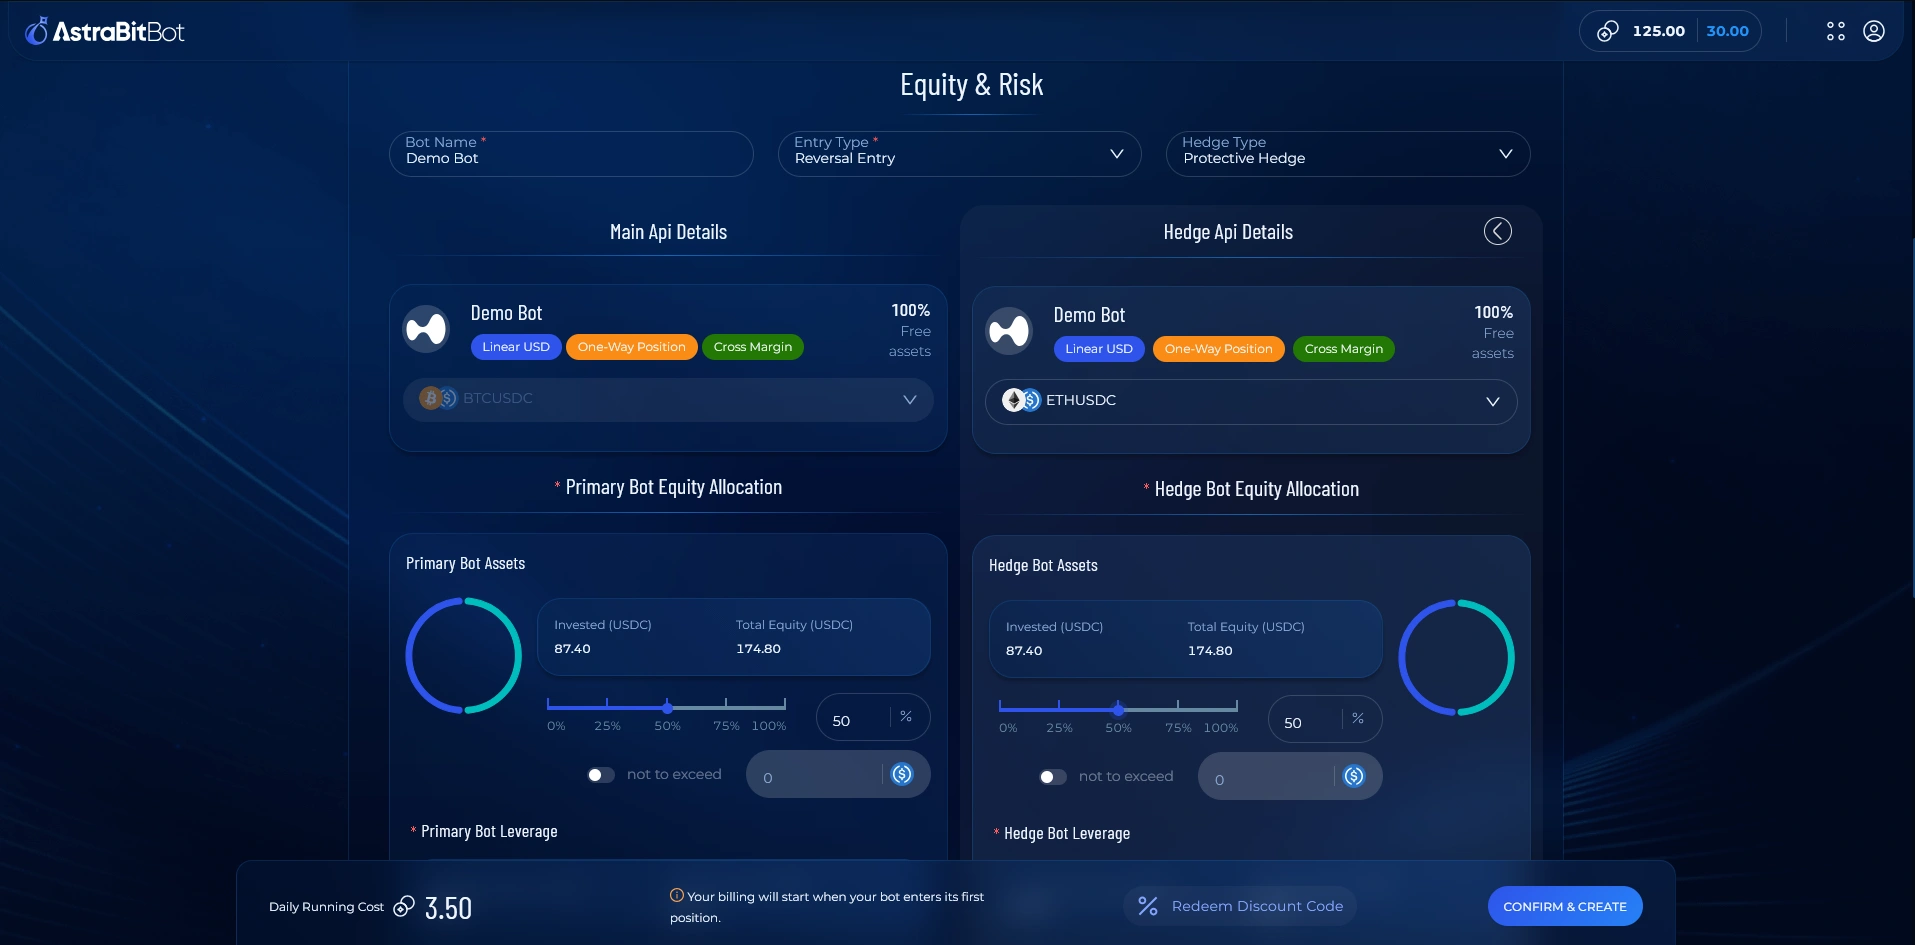
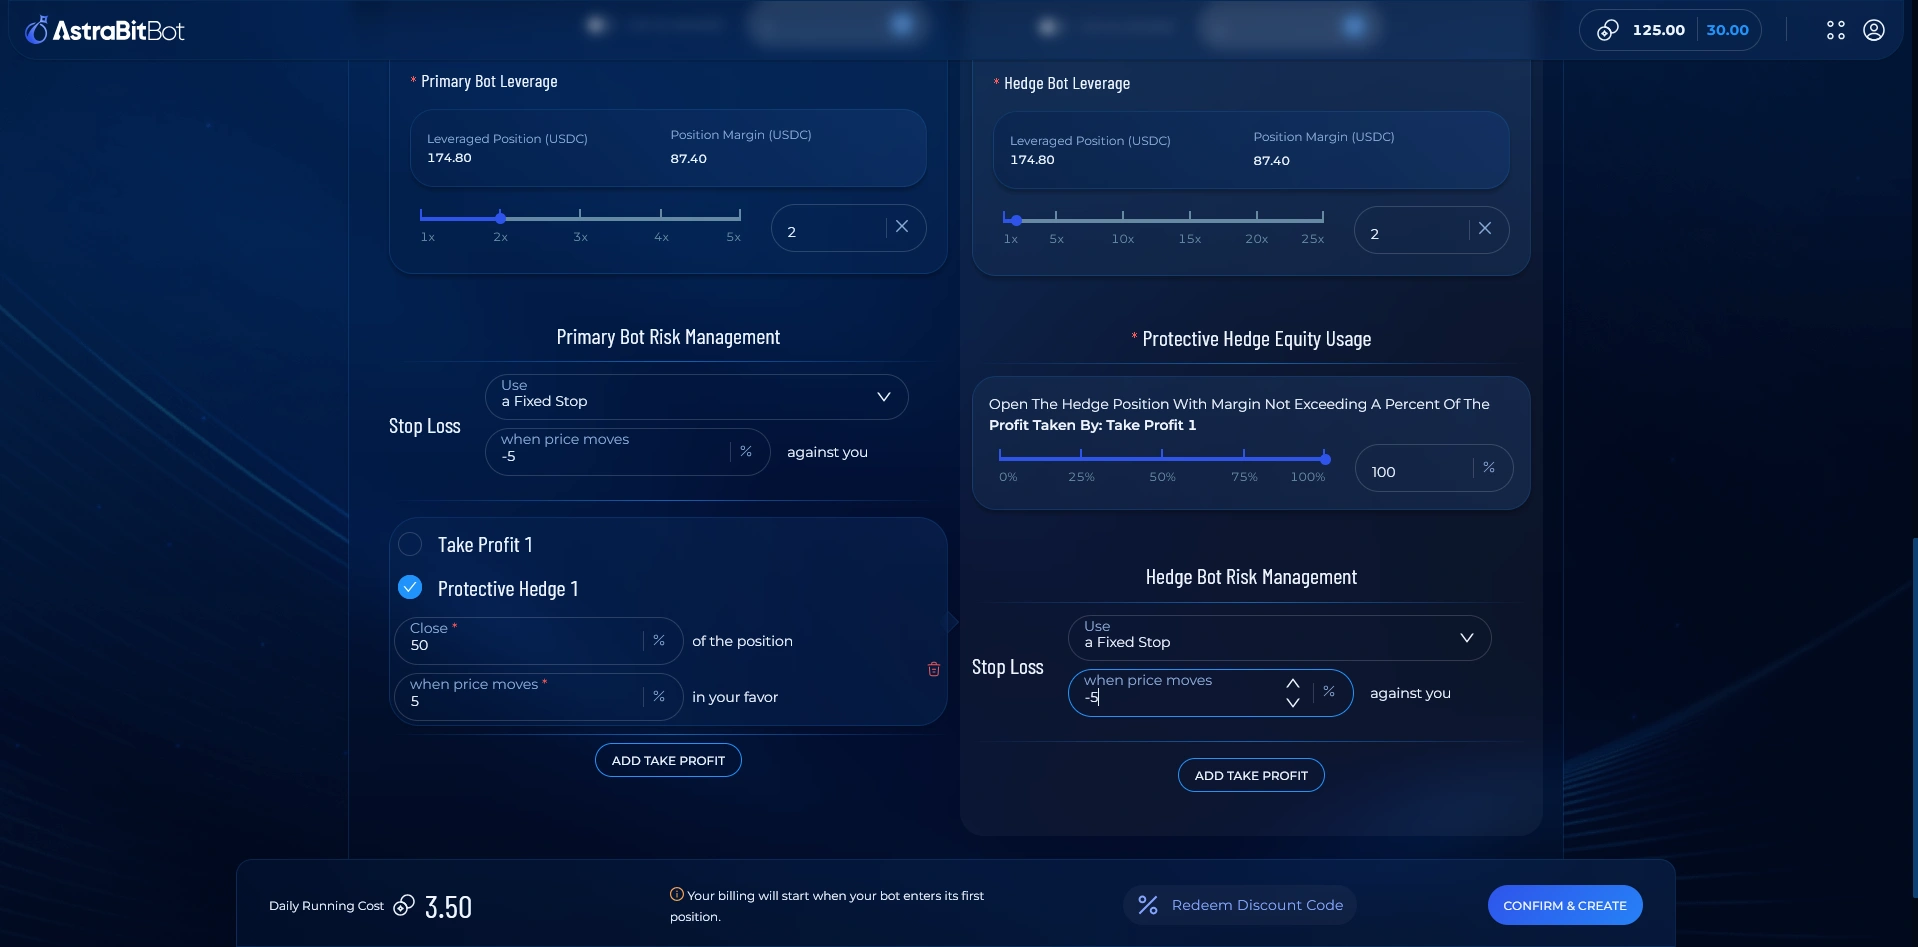
Configure Risk for Both Sides
- Set equity allocation and risk management separately for each side of the hedge.
- Review both sides, then finalize and launch as you would a standard bot.
Dollar-Cost Averaging
Create a DCA Bot
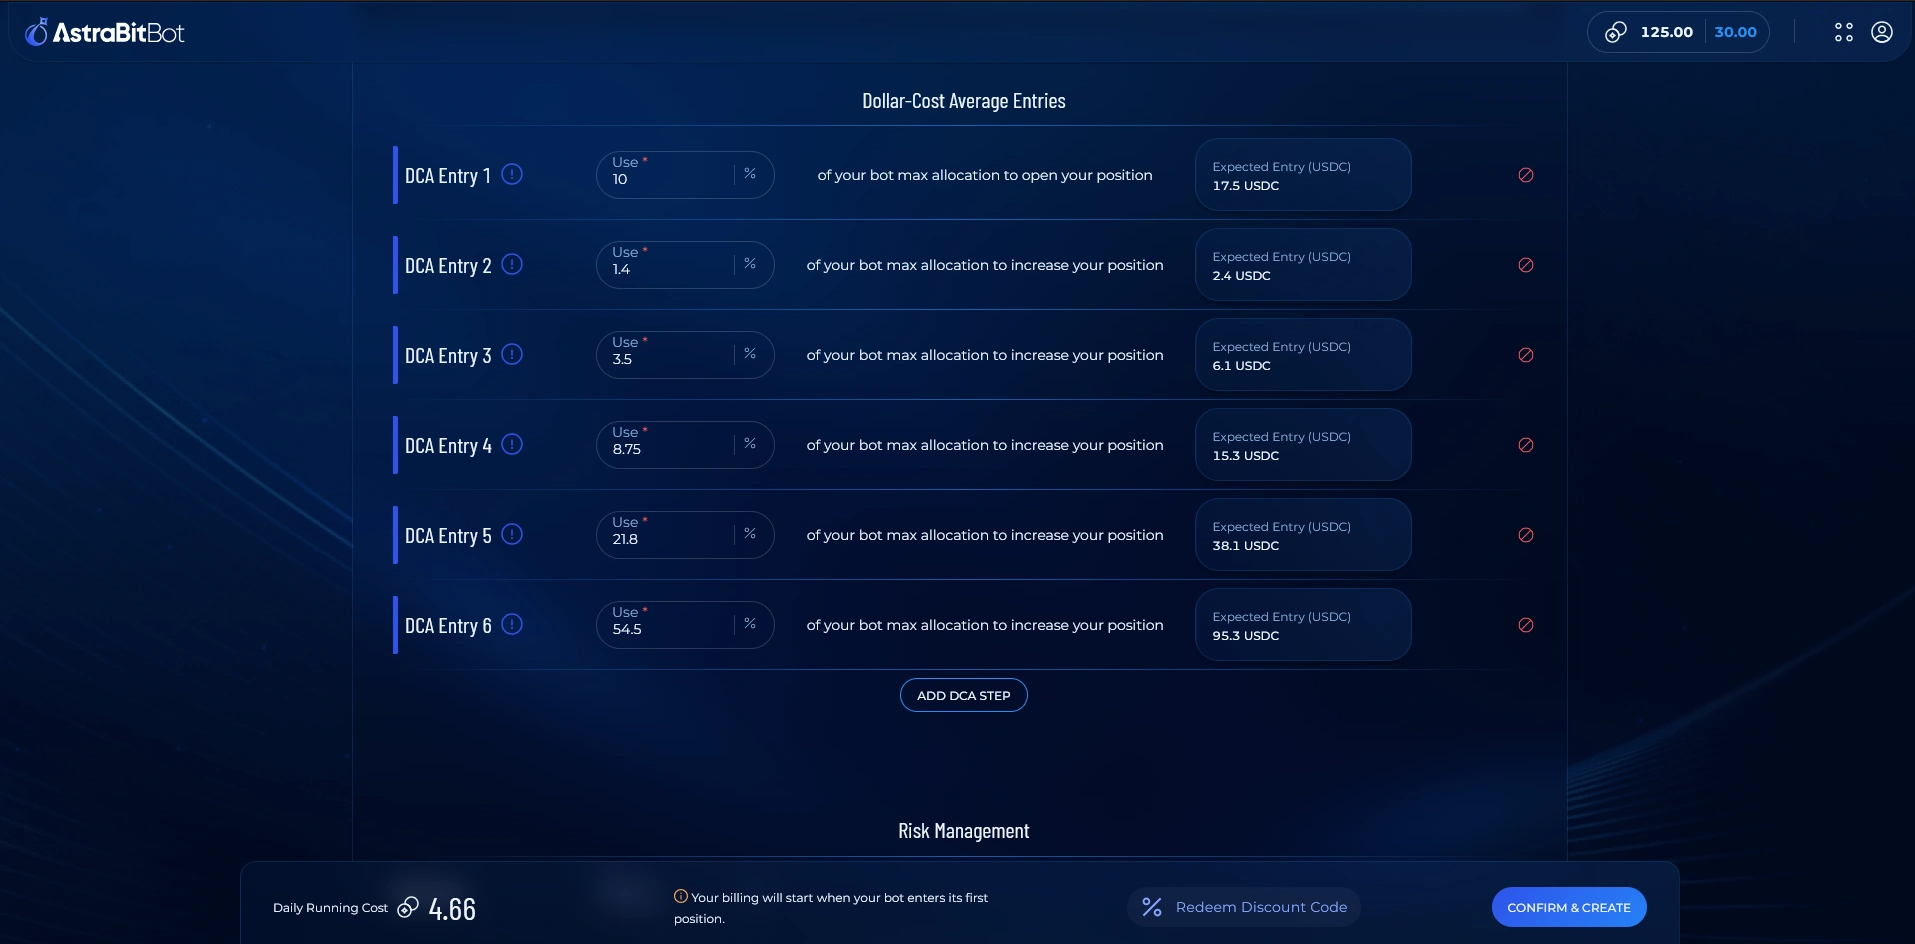
A DCA (dollar-cost averaging) bot follows the same overall flow as a standard bot — the difference is a set of DCA-specific settings to configure before you launch.
Choose a DCA Strategy
- Select a DCA strategy from the marketplace, following the standard steps.
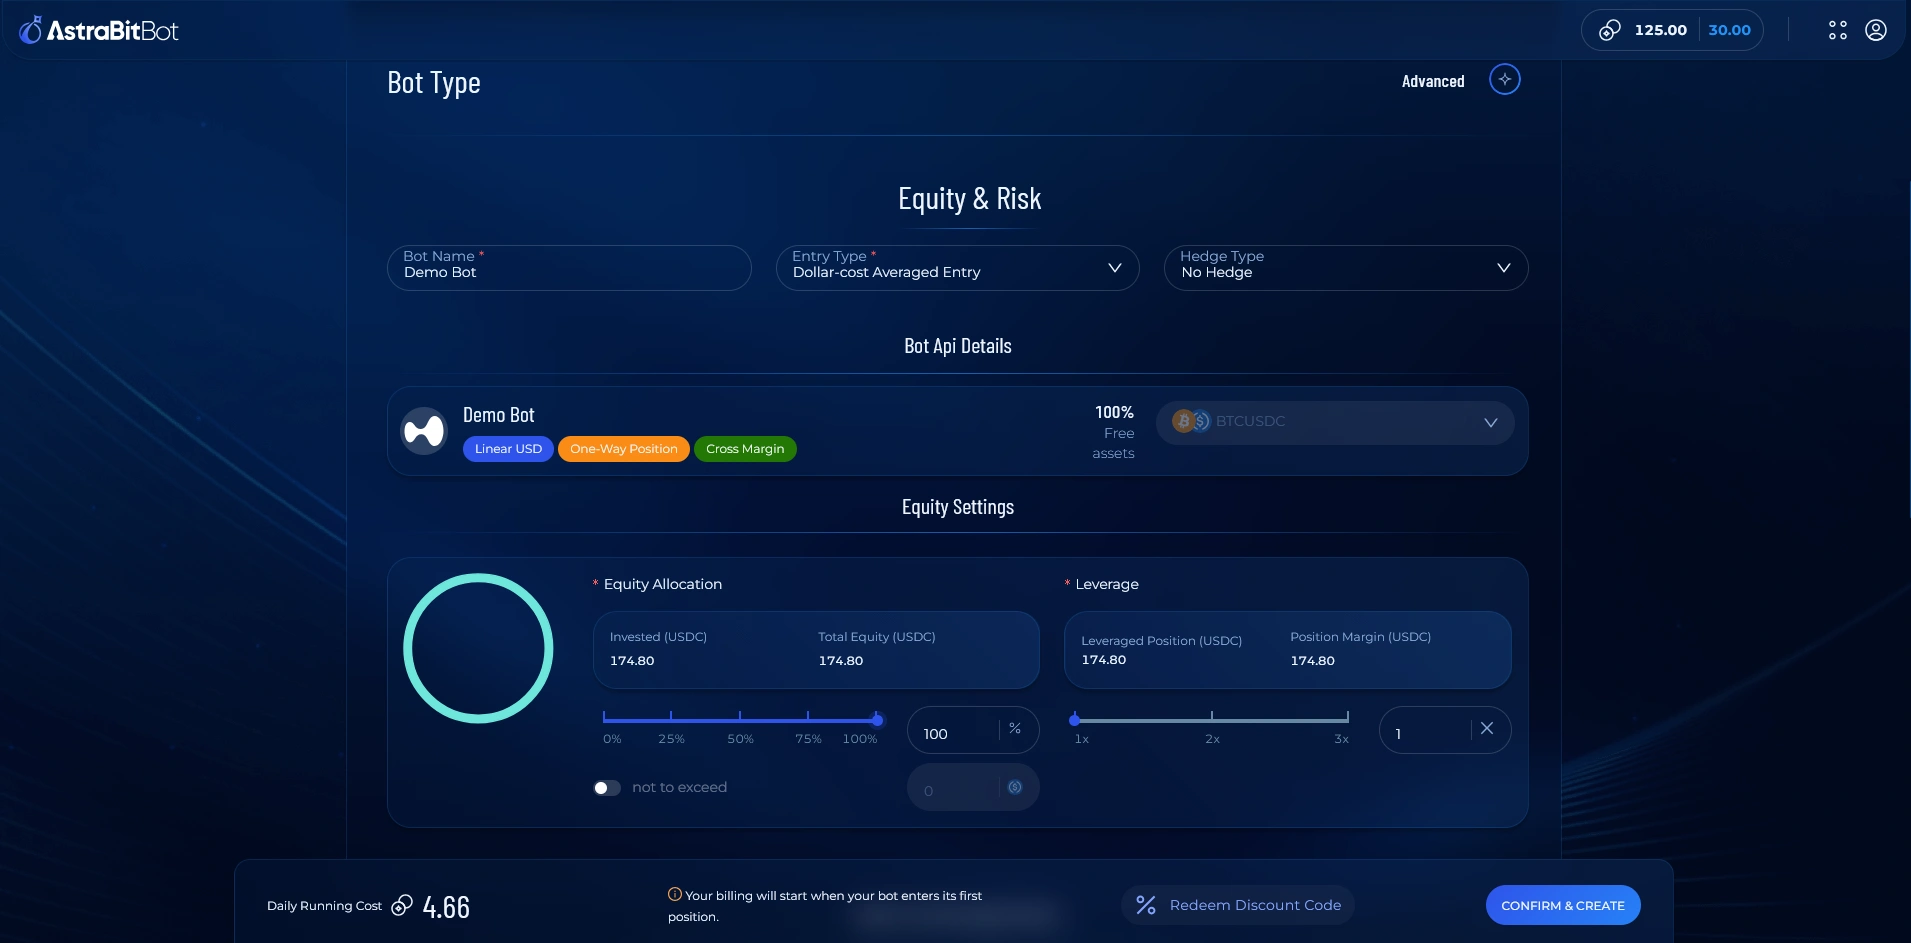
Review the DCA Settings
- DCA bots include additional settings specific to dollar-cost averaging — review these carefully before continuing.
Confirm Your DCA Bot
- Review your configuration, then finalize and launch as you would a standard bot.
AstraBit Tips
After Launch
Exchange API Creation Guides
Step-by-step API setup for every supported exchange. Asterisk (*) = Freemium eligible.
FAQs
Frequently Asked Questions
What is a crypto trading bot on AstraBit?
A crypto trading bot on AstraBit is automated software that connects to your exchange via API and executes trades based on a strategy and settings you define, reducing the need for manual trading.
What do I need before setting up a crypto trading bot with AstraBit?
You need an AstraBit account, a supported exchange account, and API keys from that exchange with trading permissions enabled and withdrawals disabled for security.
How do I choose the right bot type (Basic, Standard, or Advanced)?
Start the bot creation wizard and review the details for Basic, Standard, and Advanced bots. Then select the option that best matches your experience level, risk tolerance, and desired features such as leverage or multiple take-profit levels.
Can I use hedge mode on any bot?
No. Hedge mode is available on Advanced bots only — Basic and Standard bots cannot use it. A hedge bot runs two sides (long and short), each with its own API, pair, and equity and risk settings.
What is the margin agreement, and how often do I have to accept it?
The margin agreement appears the first time you enable leverage on a bot. It is a one-time agreement — once you accept it, you won’t be prompted again on future bots.
How can I safely test my bot before committing more capital?
Begin with a small equity allocation, confirm the test transaction during setup, and monitor performance in the AstraBit Trade screen and Nexus dashboard before increasing allocation.
When will I start being charged for my trading bot?
Charges begin only after the bot executes its first trade. You can configure your bot and view estimated daily costs in advance, but billing does not start until trading activity begins. After the first trade, charges are applied daily until the bot is stopped or deleted.
Does AstraBit have custody of my funds?
No. AstraBit does not take custody of your funds. Your assets remain on your connected exchange, and bots operate through API access with permissions you control.
Can AstraBit trading bots be used on both centralized and decentralized exchanges?
Yes. AstraBit supports automated trading across both centralized exchanges (CEX) and select decentralized exchanges (DEX), allowing you to manage strategies across different environments from one platform.
Related Concepts
Good to Know
Your Bot, Your Rules
No Custody
Your assets remain on your connected exchange — AstraBit never holds your funds.
You Control Permissions
Bots operate through API access with permissions you grant and can revoke anytime.
No Guaranteed Outcomes
A bot follows rules; it does not guarantee performance. Trading digital assets involves substantial risk.
Need help along the way?
If you experience any problems, contact support by email or submit a ticket through Discord.
